These Royal Icing Bridal Shower Cookies Look Professionally Made — Full Decorating Tutorial Inside!
COOKBOOK
Spring Bridal Shower Royal Icing Sugar Cookies — The Most Beautiful Cookies You Will Ever Make!
By The Kitchenette Bite | Bridal Shower Recipes | Cookie Decorating Tutorials
Some baked goods are delicious. Some are beautiful. And then there are these Spring Bridal Shower Royal Icing Sugar Cookies — which are both simultaneously and so completely that every single person who sees them will stop mid-conversation, reach for their phone, and ask where you ordered them from. The answer — your own kitchen — will make you the most impressive person at every bridal shower, baby shower and spring celebration from this point forward.
Decorated sugar cookies have a reputation for being the exclusive territory of professional cookie artists with expensive equipment and years of practice. That reputation ends today. The techniques in this tutorial — flooding, wet-on-wet dots, lace piping, and luster dust — are genuinely achievable for any home baker who follows the steps carefully and does not rush the drying time. The most important ingredient in decorated cookie making is patience, and patience costs nothing.
📌 This post covers the complete buttery almond sugar cookie recipe, the full royal icing guide with flooding and piping techniques, and the TOP Reddit questions about royal icing cookies — all answered! Click the Visit Site button for the full printable tutorial!
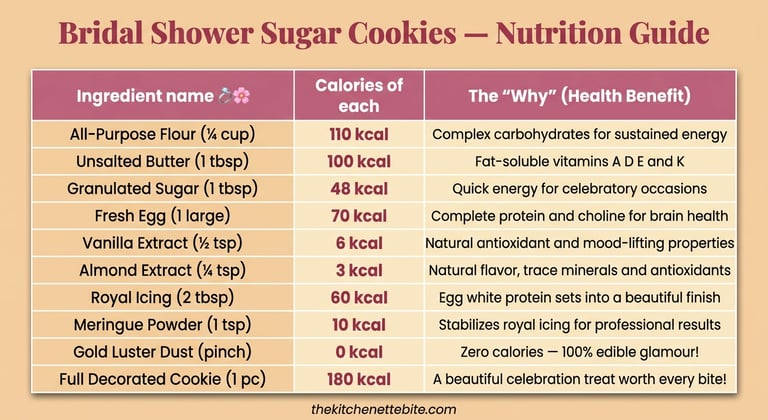
🛒 Ingredients List
For the Almond Sugar Cookies (makes approximately 24 cookies):
3 cups all-purpose flour
1 tsp baking powder
½ tsp salt
1 cup unsalted butter, softened
1 cup granulated sugar
1 large egg
2 tsp vanilla extract
1 tsp almond extract
2 tbsp heavy cream
For the Royal Icing:
4 cups powdered sugar, sifted
3 tbsp meringue powder
6–8 tbsp warm water (added gradually)
1 tsp vanilla extract or clear vanilla for bright white icing
Gel food coloring: blush pink, sage green, ivory, gold
For Decoration:
Gold luster dust
Silver luster dust
Pearl dragees in various sizes
Clear alcohol or lemon extract (for mixing with luster dust to paint)
Fine detail paintbrushes (food-safe)
Edible gold leaf sheets (optional — for extra luxury)
Equipment:
Cookie cutters: ring, heart, dress, flower, leaf/botanical sprig
Piping bags (at least 6)
Piping tips: #1 and #2 (fine detail), #3 (flooding), Wilton 101 (petal)
Squeeze bottles (for flooding icing)
Rotating decorating stand (optional but helpful)
Toothpicks or scribe tool
👩🍳 Step-By-Step Instructions
Step 1: Make the Sugar Cookie Dough
In a medium bowl whisk together the flour, baking powder, and salt. In a large bowl beat the softened butter and sugar together on high speed for 3 minutes until pale and fluffy. Add the egg, vanilla extract, almond extract, and heavy cream, beating until fully combined. Add the flour mixture and mix on low speed just until the dough comes together — do not overmix. The dough should be soft but not sticky. Divide into two equal portions, flatten each into a disc, wrap in plastic wrap, and refrigerate for at least 2 hours or overnight. Cold dough rolls and cuts cleanly without sticking or spreading. When ready to bake, preheat your oven to 350°F and line baking sheets with parchment paper.
Step 2: Roll, Cut and Bake
Remove one dough disc from the refrigerator and let it sit for 5 minutes — just enough to be rollable but still cold. Roll between two sheets of parchment paper to exactly ¼ inch thickness — a thickness guide or two ¼ inch dowels on either side of the rolling pin ensures perfectly even thickness across every cookie. Cut shapes with your cookie cutters and transfer to the parchment-lined baking sheet. Re-roll scraps once only — overworked dough becomes tough. Refrigerate the cut shapes on the baking sheet for 10 minutes before baking — this re-chill prevents spreading and keeps edges sharp and clean. Bake at 350°F for 10–12 minutes until the edges are just barely beginning to turn golden — the centers should look slightly underdone. Do not overbake — pale soft-centered cookies hold royal icing decoration far better than crispy ones. Cool completely on a wire rack — at least 1 hour — before decorating.
Step 3: Make the Royal Icing — Two Consistencies
Royal icing for decorated cookies requires two different consistencies — flooding consistency for the smooth base layer and piping consistency for the raised detail work. Start with piping consistency: beat sifted powdered sugar, meringue powder, vanilla, and 5 tbsp of warm water with a hand mixer for 5 minutes until the icing is bright white, smooth, and holds stiff peaks that curl at the tip. This is your piping consistency — it holds the shape of any piped detail immediately. Divide it between your piping bags with your detail tips and set aside. For flooding consistency: take approximately half of the piping icing and add warm water one teaspoon at a time, stirring gently until the icing flows slowly off a spoon and a line drawn through the surface with a toothpick disappears in exactly 10 seconds. This 10-second test is the professional standard for perfect flooding consistency. Color your flooding icing with gel food coloring as desired — blush pink, ivory, white, and sage green for this bridal palette.
Step 4: Flood the Base Layer
Using a piping bag with a #2 tip and piping consistency icing, pipe an outline border around the entire edge of each cookie. This border acts as a dam to contain the flooding icing. Let the outline sit for 2 minutes to form a slight skin. Then fill the inside of the outline with flooding consistency icing using a squeeze bottle or piping bag — flood from the center outward in a slow circular motion. Use a toothpick or scribe tool to spread the flooding icing into every corner and edge, popping any air bubbles by dragging the toothpick through them. The surface should be completely smooth and level. Let the flooded cookies dry for a minimum of 4 hours — overnight is strongly recommended — before adding any detail piping on top. Rushing this step is the single biggest mistake in cookie decorating and results in detail piping that sinks into the wet base rather than sitting raised on top.
Step 5: Add Detail Decoration
Once the base flood layer is completely dry and set — it should feel completely hard and non-tacky to a light touch — begin your detail decoration. For lace dress cookies: pipe tiny dot patterns, scalloped borders, and delicate floral sprigs in bright white piping consistency icing using a #1 tip. For engagement ring cookies: flood with white and allow to dry, then use a #1 tip to pipe a raised diamond shape in the center — build it up in 3 layers allowing each layer to set for 20 minutes before the next. Mix gold luster dust with a tiny amount of clear alcohol to form a paint and brush over the diamond with a fine brush to create a metallic gemstone effect. For botanical sprig cookies: pipe delicate stems and tiny leaf shapes in sage green piping icing and add tiny blush pink dot flowers at intervals. For heart cookies: paint a thin gold border around the outer edge using gold luster paint and pipe tiny rose buds across the surface. Apply pearl dragees to wet icing immediately so they adhere permanently as the icing dries around them.
🙋 Top Royal Icing Cookie Questions from Reddit — Answered!
❓ Reddit Q1: “My royal icing is bumpy and not smooth after flooding — how do I get that glass-smooth finish?”
Bumpy royal icing after flooding has three main causes. First — flooding icing that is too thick. If the icing does not flow freely to fill all the gaps and self-level after flooding it will set with the uneven surface you created while spreading rather than smoothing itself out. The 10-second test is your guide — too thick means it takes longer than 10 seconds for a drawn line to disappear. Second — air bubbles. After flooding use a scribe tool or toothpick to pop every visible air bubble within the first 2 minutes before a skin forms. For stubborn bubbles a very quick pass with a kitchen torch held 6 inches above the surface pops them all simultaneously and also helps the surface self-level. Third — drying too fast. In a very dry or warm environment royal icing can form a skin before it has fully settled. Cover loosely with a light cloth during the first 30 minutes of drying to slow the process and allow more time for self-leveling.
❓ Reddit Q2: “How far in advance can I make decorated royal icing cookies and how do I store and package them?”
Decorated royal icing sugar cookies are one of the absolute best make-ahead party foods available. The baked undecorated cookies keep at room temperature in an airtight container for up to 2 weeks — they actually improve in texture slightly after the first day as they soften to the perfect chewy-firm consistency. Once decorated with royal icing the cookies keep perfectly at room temperature in a single layer uncovered for the first 24 hours while the icing fully cures and hardens completely. After 24 hours they can be stacked with parchment paper between layers and stored in an airtight box at room temperature for up to 3 weeks — royal icing acts as a moisture barrier that keeps the cookie beneath fresh indefinitely. Never refrigerate royal icing cookies — condensation forms on the icing surface when they return to room temperature, causing the colors to bleed and the surface to become sticky.
❓ Reddit Q3: “What is the best way to achieve perfectly consistent color in royal icing and why does my pink always look different between batches?”
Color consistency in royal icing is one of the most frustrating challenges for home decorators and the cause is almost always the type of food coloring used. Liquid food coloring adds water to the icing which changes the consistency unpredictably and gives weak washed-out colors — never use liquid food coloring in royal icing. Gel food coloring is the standard for decorated cookies because it adds concentrated color with minimal liquid impact. However even with gel coloring royal icing darkens significantly as it dries — a soft pink that looks perfect when wet will often dry 2 to 3 shades deeper. Professional decorators always mix to a shade lighter than their target color when wet to account for this darkening. For perfect batch-to-batch consistency mix a larger amount of colored icing than you need in one session and store the excess covered tightly with plastic wrap pressed directly onto the surface of the icing — this stored icing can be refreshed with a few drops of water and rewhipped for the next decorating session.
💡 Pro Tips for Professionally Decorated Cookies
Always use gel food coloring — never liquid. Gel gives vivid saturated color with no consistency change.
The 10-second test for flooding icing is non-negotiable — this single test prevents 90% of all flooding problems.
Dry overnight between flooding and detail piping — this one step is the difference between professional and amateur results.
Gold luster dust mixed with clear alcohol paints like real metallic gold — use a very fine food-safe brush and build up thin layers for the most brilliant metallic finish.
Keep your piping bags small — smaller bags give more control and less hand fatigue during fine detail work.
Work on a rotating decorating stand for the cleanest borders and most even detail piping — rotating the cookie while keeping your piping hand still creates much more consistent lines.
💍 Cookie Design Variations for Every Occasion
Baby Shower Version: Swap ring and dress shapes for onesie, baby bottle, rattle, and star shapes — use pastel yellow, mint green, and white for a gender-neutral palette.
Easter Version: Use egg, bunny, carrot, and flower shapes with pastel rainbow colors — the same royal icing techniques create the most beautiful Easter cookie collection imaginable.
Birthday Version: Use number cutters for the guest of honor’s age, balloon shapes, and cake shapes — gold and the birthday person’s favorite colors.
Christmas Version: Snowflake, ornament, and wreath shapes with white, red, and gold royal icing — the lace piping technique creates the most beautiful snowflake cookies of your life.
🌸 The Most Impressive Cookies You Will Ever Bring to a Party!
There is a specific kind of silence that falls over a room when a tray of beautifully decorated cookies is set on the party table — and then immediately everyone reaches for their phone to photograph them before anyone dares to eat one. That silence is yours to create. These Spring Bridal Shower Royal Icing Sugar Cookies are the most impressive, most beautiful, most talked-about item you will ever bring to a celebration.
Save this to your Pinterest board so you have the complete tutorial every bridal shower season — and click the Visit Site button for the full printable recipe and decorating guide at thekitchenettebite.com! 🌸💍

Subscribe to our newsletter
Cook it before it’s trending