The Only Brownie Recipe You Will Ever Need
Say goodbye to dry, cakey brownies forever. 👋🍫 These Homemade Fudgy Brownies are the definition of chocolate perfection. We’re talking chewy edges, a gooey molten center, and that famous shiny crackle top. And the best part? No mixer required! You can whip these up in one bowl in under 15 minutes. Why this recipe wins: 🍫 Double Chocolate: Made with cocoa powder AND chocolate chunks. ✨ Crackle Top: We share the secret technique to get that paper-thin crust. 🥣 One Bowl: Easy cleanup for busy bakers. Perfect for satisfying late-night cravings or bringing to a potluck. Click for the full recipe and learn the secret to the perfect brownie texture! #BrownieRecipe #ChocolateDessert #FudgyBrownies #BakingTips #EasyDesserts #ChocolateLover #BetterThanBoxMix #ComfortFood
DESSERTS
Prep Time: 15 mins | Bake Time: 25-30 mins | Yields: 9 Large Brownies
We melt the butter with the sugar to get that shiny crust, and we use both cocoa powder and melted chocolate chunks for a double-chocolate punch.
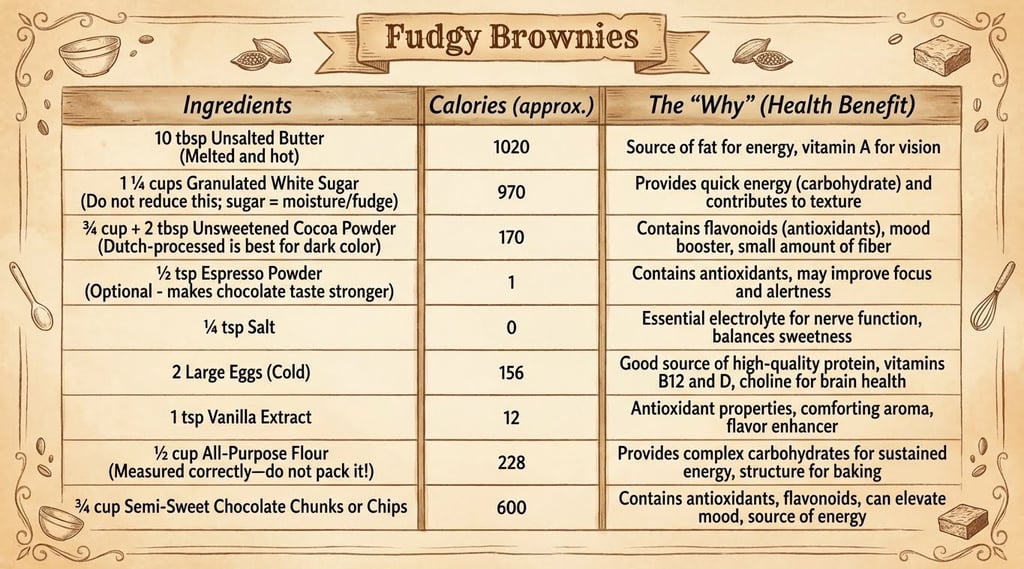
🛒 The Grocery List
10 tbsp Unsalted Butter (Melted and hot)
1 ¼ cups Granulated White Sugar (Do not reduce this; sugar = moisture/fudge)
¾ cup + 2 tbsp Unsweetened Cocoa Powder (Dutch-processed is best for dark color)
½ tsp Espresso Powder (Optional - makes chocolate taste stronger)
¼ tsp Salt
2 Large Eggs (Cold)
1 tsp Vanilla Extract
½ cup All-Purpose Flour (Measured correctly—do not pack it!)
¾ cup Semi-Sweet Chocolate Chunks or Chips
🍳 INSTRUCTIONS: From Zero to Hero
Step 1: The "Non-Stick" Prep
Heat: Preheat your oven to 325°F (160°C).
Note: We use a slightly lower temperature than usual (350°F) so the brownies bake slowly and stay fudgy without burning the edges.
The Pan: Use an 8x8 inch (20cm) light-colored metal pan.
Why metal? Glass pans take too long to heat up and can make the edges hard while the center is raw.
The Lining: Cut a piece of parchment paper to line the bottom and sides of the pan. Leave a 2-inch overhang on two sides. This creates "handles" so you can lift the entire brownie block out later for perfect cutting. Grease the parchment lightly with butter or cooking spray.
Step 2: The "Hot Butter" Technique (The Secret to the Crackle Top)
The Melt: In a large microwave-safe bowl, melt the 10 tablespoons of butter. Make sure it is completely liquid and hot.
The Sugar Shock: Immediately pour the 1 ¼ cups of sugar and ¼ teaspoon of salt into the hot butter.
The Cocoa: Whisk in the cocoa powder now, too.
Action: Use a hand whisk or electric mixer to beat this mixture vigorously for 1 to 2 minutes.
The Science: The heat from the butter helps melt the sugar slightly. This is exactly what creates that paper-thin, shiny crust on top later. The mixture will look gritty like wet sand—that is normal!
Step 3: The Gloss Phase
Check Temp: Stick your finger in the batter. Is it warm but not scalding hot? Good. If it's boiling hot, wait 2 minutes so you don't scramble the eggs.
The Eggs: Add the vanilla extract. Then, crack in the eggs one at a time.
The Beat: Whisk vigorously after each egg. Once both eggs are in, beat the batter hard for another 60 seconds.
Visual Check: The batter should transform. It will stop looking grainy and separate. Instead, it should look thick, shiny, and smooth, and it should pull away slightly from the sides of the bowl. This is called the "emulsified" stage.
Step 4: The Gentle Fold (Texture Control)
Add Dry: Dump in the ½ cup of flour and the espresso powder (if using).
Stop Whisking: Put the whisk away. Switch to a rubber spatula or wooden spoon.
The Fold: Gently fold the flour into the wet batter.
Technique: Scrape down the side, go across the bottom, and flip over.
The Rule: Stop mixing the second the white flour streaks disappear. If you over-mix here, you develop gluten, and your brownies will taste like tough bread.
The Chocolate: Fold in the chocolate chunks or chips.
Step 5: The Bake
Pour: Scrape the thick batter into your prepared pan. Use the spatula to push it into the corners and smooth the top.
Bake: Place the pan on the middle rack of the oven. Bake for 25 to 30 minutes.
The Toothpick Test (Crucial):
Check at 25 minutes. Insert a toothpick into the center.
If it comes out with wet batter: Needs more time (check again in 2-3 mins).
If it comes out clean: You overcooked them (take them out immediately!).
The Goal: The toothpick should come out with moist, sticky crumbs attached to it, but no wet smear. That is perfection.
Step 6: The "Torture" Phase (Cooling)
Patience: This is the hardest step. You must let the brownies cool completely in the pan on a wire rack. This takes about 1.5 to 2 hours.
Why? Brownies are still goo in the middle when they come out of the oven. They bake and set as they cool down ("carry-over cooking"). If you cut them hot, they will fall apart into a mess.
Step 7: The Perfect Cut
Lift: Grab the parchment paper handles and lift the cool brownie block out onto a cutting board.
The Knife Trick: Run a large sharp knife under hot water, wipe it dry, and then make a cut. The heat melts through the chocolate chunks cleanly. Wipe the knife after every single cut.
Serve: Cut into 9 large squares (or 16 small bites) and enjoy!
🔥 Total Calories Per Brownie: ~280 Calories ✨ Feature: Nut-Free
💡 Reddit-Inspired Troubleshooting (FAQ)
No Crackle Top? You didn't whisk enough. You must whisk the hot butter and sugar vigorously for 2 minutes to create that shiny crust.
Too Cakey? You used too much flour. Spoon the flour into your cup (don't scoop!) and never use baking powder for fudgy brownies.
Hard Edges / Raw Middle? You used a glass pan. Glass cooks unevenly. Always use a light metal pan for the perfect texture.
Messy Cuts? You cut them hot. Chill them in the fridge for 30 minutes, then use a hot knife to slice.
Subscribe to our newsletter
Cook it before it’s trending