The 'Melt-In-Your-Mouth' Creamy Garlic Chicken (Better Than Takeout)
Stop scrolling and save this for dinner tonight! 🛑🍗 Imagine biting into crispy, golden-brown chicken skin followed by juicy meat swimming in a rich garlic parmesan cream sauce. The best part? This restaurant-quality meal is made in one pan and ready in just 20 minutes. Whether you are doing Keto, Low Carb, or just crave pure comfort food, this recipe is a lifesaver for busy weeknights. Why you’ll love it: ✅ The "Crispy Skin" Hack (No soggy chicken here!) ✅ Zero Cleanup: Only one skillet to wash. ✅ Kid-Approved: The cheesy sauce makes them eat the spinach! Click to get the full step-by-step guide on The Kitchenette Bite. Trust us, the sauce alone is worth the click! 🧀✨ Tags: #ChickenRecipes #EasyDinner #KetoRecipes #OnePanMeals #ComfortFood #CastIronCooking #GarlicChicken #WeeknightDinner
CHICKEN
Prep Time: 10 mins | Cook Time: 20 mins | Servings: 4
This uses bone-in, skin-on thighs for maximum juiciness, but includes a hack to keep the skin crispy even in the sauce.
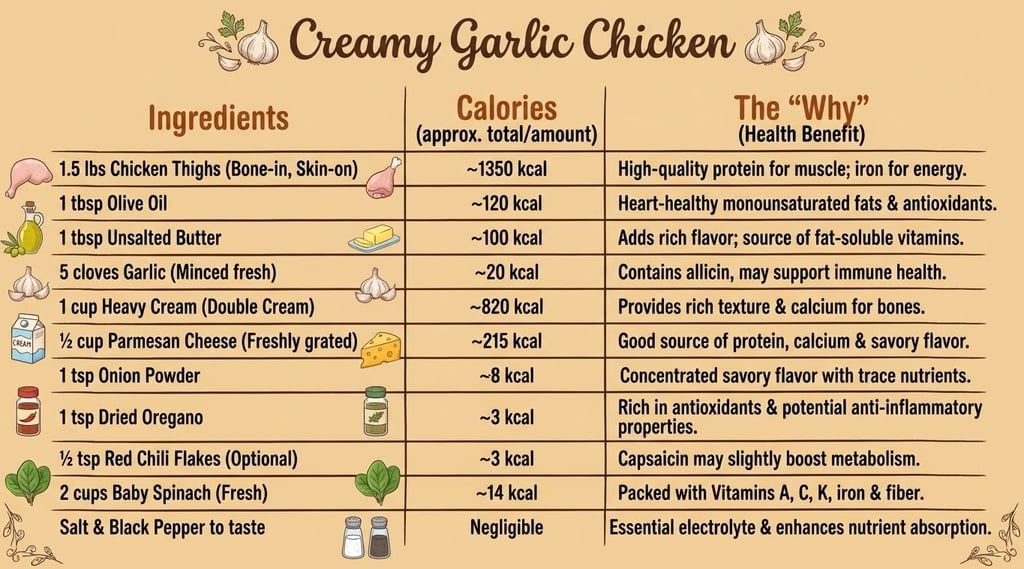
🛒 The Grocery List
1.5 lbs Chicken Thighs (Bone-in, Skin-on for best flavor)
1 tbsp Olive Oil
1 tbsp Unsalted Butter
5 cloves Garlic (Minced fresh—do not use jarred!)
1 cup Heavy Cream (Double Cream)
½ cup Parmesan Cheese (Freshly grated)
1 tsp Onion Powder
1 tsp Dried Oregano
½ tsp Red Chili Flakes (Optional for a kick)
2 cups Baby Spinach (Fresh)
Salt & Black Pepper to taste
🍳 INSTRUCTIONS: From Zero to Hero
Step 1: The "Dry & Temper" Technique (Crucial Prep)
Before you even touch the stove, take your chicken thighs out of the fridge and let them sit on the counter for about 10-15 minutes to take the chill off. Cold chicken hitting a hot pan seizes up and cooks unevenly.
Action: Take a paper towel and firmly pat each chicken thigh completely dry.
Why? Moisture is the enemy of crispiness. If the chicken is wet, it will steam instead of sear. You want golden-brown skin, not soggy skin!
Seasoning: In a small bowl, mix the salt, black pepper, and onion powder. Rub this seasoning generously over both sides of the chicken, paying extra attention to the skin side.
Step 2: The Perfect Sear
Heat Control: Place a large cast-iron skillet (or heavy-bottomed pan) over medium-high heat. Add the olive oil and let it heat up until it is shimmering but not smoking.
The Sizzle: Place the chicken thighs into the pan, skin-side down. You should hear an aggressive sizzle immediately. If you don't, the pan isn't hot enough—take it out and wait.
The "No Touch" Rule: Once the chicken is in the pan, do not move it. Let it cook undisturbed for 5 to 7 minutes.
The Flip: Test one piece by lifting the corner with tongs. Is the skin a deep, golden-brown crispy color? Does it release easily from the pan? If yes, flip it over. Cook the other side for just 2-3 minutes to seal it.
Resting: Remove the chicken from the pan and set it on a plate. It won't be fully cooked inside yet; that’s okay!
Step 3: Creating the Flavor Base (The Fond)
Look at the Pan: See those brown sticky bits stuck to the bottom of the skillet? That is called fond, and it is pure flavor. Do not wash the pan!
Fat Check: If there is too much grease left in the pan, pour some out so you are left with about 1 tablespoon.
Aromatics: Turn the heat down to Medium. Add the unsalted butter. Once melted, toss in your minced garlic. Stir constantly for only 30-45 seconds.
Warning: Garlic burns very fast. As soon as you smell that delicious garlic aroma and it turns a light gold, move to the next step immediately.
Step 4: Building the Cream Sauce
Deglaze: Pour the heavy cream into the skillet. Use a wooden spoon or silicone spatula to scrape up those brown bits (the fond) from the bottom. They will dissolve into the cream and turn it a beautiful beige color.
Simmer: Add the dried oregano and red chili flakes (if using). Let the liquid bubble gently on medium heat for about 3 minutes. You will see it start to reduce slightly.
Step 5: The "Melting" Phase
Thickening: Reduce the heat to Low. This is critical—if the heat is too high when you add cheese, the sauce will split and get oily.
Cheese: Sprinkle in the freshly grated Parmesan cheese. Stir continuously until the cheese has melted into the cream.
Texture Check: The sauce should now be smooth and thick enough to coat the back of your spoon. Taste it! Does it need a pinch more salt? Now is the time to add it.
Step 6: The Wilt & Finish
Add Greens: Toss in the baby spinach. It will look like a mountain of spinach, but it will shrink down in about 1 minute. Stir it into the hot sauce until it is soft and wilted.
Return the Chicken: Place the chicken thighs back into the pan.
Critical Tip: Place them skin-side up. Do not spoon the sauce over the crispy skin, or it will get soggy. Let the chicken sit on top of the spinach and sauce.
Final Simmer: Let everything simmer together on low heat for another 5-8 minutes. This finishes cooking the chicken gently from the bottom up.
Safety Check: If you have a meat thermometer, insert it into the thickest part of the thigh. It should read 165°F (74°C).
Step 7: Serving
Turn off the heat. Let the pan sit for 2 minutes before serving. This allows the juices in the chicken to redistribute.
Serve a thigh with a generous scoop of creamy spinach sauce underneath or on the side (remember: save the skin!).
🔥 Total Calories Per Serving: ~660 Calories ✨ Keto/Low Carb: Yes (Only ~4g Net Carbs)
💡 Reddit-Inspired Troubleshooting (FAQ)
"My sauce separated!" -> You likely had the heat too high when adding the cheese. Keep it on low simmer!
"Can I use chicken breast?" -> Yes, but pound them thin first so they don't dry out. Cook time will be faster (3-4 mins per side).
"Storage?" -> Store in an airtight container for up to 3 days. Reheat on the stove, not the microwave, to keep the skin decent.
Subscribe to our newsletter
Cook it before it’s trending