Sea Salt Caramel Cookies - Gooey Caramel Center With Chocolate and Flaky Salt!
COOKBOOK
Sea Salt Caramel Cookies — The Gooey Pull Apart Cookie That Everyone Is Obsessed With!
By The Kitchenette Bite | Easy Cookie Recipes | Salted Caramel Desserts
There is a specific kind of cookie that exists at the absolute peak of what a cookie can be. Thick enough to have real substance. Edges crispy and caramelized. Center still warm and barely set. Dark chocolate chunks pooled across the surface. Amber caramel visible in glossy pools between the chocolate. And flaky sea salt crystals scattered over every surface catching the light like tiny diamonds. Pull one apart while it is still warm and a thick ribbon of stretchy liquid caramel extends between the two halves, thinning slowly, catching the light like amber silk before finally breaking. That is this cookie. And once you make it you will never make a plain chocolate chip cookie again.
The secret to the stretchy caramel pull is the key ingredient — a dark chocolate bar with a caramel filling, broken into chunks and folded directly into the cookie dough. During baking the chocolate melts into pools across the cookie surface while the caramel filling inside each chunk becomes completely liquid. When you pull the cookie apart while it is still warm the liquid caramel inside those melted chunks stretches dramatically between the two halves — exactly like the caramel pull in a Twix or Milky Way but embedded in a thick buttery cookie. The flaky sea salt on top is the finishing touch that makes every flavor in the cookie taste more intense — the salt hits the caramel and makes it taste sweeter, hits the chocolate and makes it taste deeper, and hits the buttery cookie and makes everything taste more complex and sophisticated.
This post covers the complete brown butter technique, the caramel chunk method, and the TOP Reddit questions about salted caramel cookies — all answered! Click the Visit Site button for the full printable recipe card!
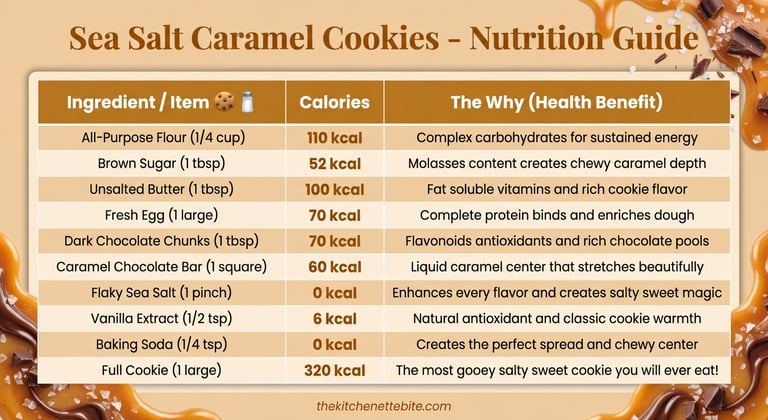
Ingredients List
For the Sea Salt Caramel Cookie Dough (makes 12 large cookies):
2 and 1/4 cups all-purpose flour
1 tsp baking soda
1 tsp salt
1 cup unsalted butter
3/4 cup granulated sugar
3/4 cup packed brown sugar
2 large eggs, room temperature
2 tsp vanilla extract
1 and 1/2 cups dark chocolate chunks or roughly chopped dark chocolate bar
For the Caramel Filling:
2 full size caramel filled dark chocolate bars such as Ritter Sport Caramel or any dark chocolate caramel bar — broken into rough chunks
OR 12 individual soft caramel candies wrapped in a small square of cookie dough to create a stuffed center
For the Finishing:
Flaky sea salt such as Maldon — absolutely non-negotiable
Extra dark chocolate chunks pressed on top of each dough ball before baking
Step-By-Step Instructions
Step 1: Brown the Butter for Maximum Flavor
The single biggest flavor upgrade you can make to any cookie recipe is browning the butter and this recipe takes full advantage of that technique. Place the butter in a light colored saucepan over medium heat — a light colored pan lets you see the color change clearly. Stir continuously as the butter melts and foams. After about 5 minutes the foam will subside and you will see golden brown bits beginning to form on the bottom of the pan — this is the milk solids caramelizing and it smells nutty and extraordinary. The moment the butter turns a deep amber-golden color and smells like toasted hazelnuts remove it immediately from the heat and pour into your mixing bowl. Let cool for 10 minutes. Browning the butter adds a nutty caramel depth that makes these cookies taste like they came from a professional bakery.
Step 2: Make the Dough
Whisk the granulated sugar and brown sugar into the cooled brown butter until smooth. Add both eggs and vanilla and whisk vigorously for 90 seconds until the mixture is slightly thickened and pale — this whipping step dissolves the sugar and creates the chewy texture that makes a great cookie. Add the flour, baking soda, and salt and fold with a spatula until just combined — no white streaks of flour visible but do not overmix. Fold in the dark chocolate chunks. Break the caramel chocolate bars into rough irregular pieces — keeping them rough rather than uniform creates more interesting caramel pockets throughout. Fold the caramel chocolate chunks in last with just 4 to 5 folds so they are distributed but not broken down. Cover the bowl and refrigerate for a minimum of 1 hour and up to 72 hours. Cookie dough rested overnight produces a noticeably superior cookie with more complex flavor and a better texture than freshly made dough.
Step 3: Portion and Top
Preheat oven to 375 degrees F. Line baking sheets with parchment paper. Use a large cookie scoop or 3 tablespoon measure to portion the dough into tall balls — keep them tall rather than pressing them flat. Taller dough balls produce thicker cookies with a better ratio of crispy edge to gooey center. Press 2 to 3 extra dark chocolate chunks and one small piece of caramel chocolate on the very top surface of each dough ball — these surface chunks melt into the beautiful visible caramel and chocolate pools on the finished cookie. Space at least 3 inches apart on the baking sheet.
Step 4: Bake to Gooey Perfection
Bake at 375 degrees F for 10 to 12 minutes. This is the most important window in the recipe. At 10 minutes the edges will be set and golden but the center will look underdone and shiny — this is perfect. The cookies continue cooking on the hot baking sheet for 3 to 4 minutes after coming out of the oven and finish cooking to a perfectly set chewy center during this rest. Pulling them at 10 minutes produces the gooey chewy center. At 12 minutes the cookies are more fully set throughout with less gooey center. Beyond 13 minutes the caramel pools begin to harden and the cookie loses its signature pull-apart character. Immediately after removing from the oven while the cookies are still completely soft use a round cookie cutter or the rim of a glass slightly larger than each cookie and swirl it around each cookie in a circular motion — this rounds any irregular edges and creates that perfect circular bakery shape. Immediately sprinkle flaky sea salt generously over every cookie while they are still hot so the salt adheres to the soft surface.
Step 5: Rest and Reveal
Let the cookies rest on the baking sheet for exactly 5 minutes — long enough to be structurally sound when lifted but still warm enough for the caramel center to be completely liquid. Lift with a spatula and serve immediately. For the pull-apart reveal grip the cookie from either side and pull slowly apart — the liquid caramel inside the melted caramel chunks will stretch in thick amber threads between the two halves. The slower you pull the more dramatic the stretch. Eat immediately.
Top Salted Caramel Cookie Questions — Answered!
Question 1: “How do I get a really stretchy caramel pull in my cookies and what is the best caramel to use?”
The stretchy caramel pull depends entirely on using the right type of caramel in the right way. The most reliable method is using a caramel-filled chocolate bar broken into chunks and folded into the dough — Ritter Sport Dark Caramel, Lindt Sea Salt Caramel, or any dark chocolate bar with a soft caramel center works beautifully. The chocolate exterior melts into pools on the cookie surface while the caramel filling becomes completely liquid inside. For an even more dramatic pull use the stuffed method — wrap a single unwrapped soft caramel candy like Werther’s Soft Caramels or a Kraft caramel in a thin layer of cookie dough before forming the full dough ball around it. The wrapped caramel melts into a completely liquid center surrounded by cookie — the pull from this method is even more dramatic than the chunk method because there is a larger continuous pool of liquid caramel in the center.
Question 2: “My salted caramel cookies spread out completely flat instead of staying thick and chewy — what happened?”
Flat spreading cookies have four possible causes in this specific recipe. First — butter that was too warm when the sugars were added. Even browned butter needs to cool for 10 minutes before mixing — warm butter produces flat cookies. Second — dough that was not chilled before baking. Cold dough spreads more slowly in the oven allowing the exterior to set while the center is still rising, producing a thicker result. Always chill for at least 1 hour. Third — too much brown sugar relative to white sugar. Brown sugar creates spread. If your cookies are consistently flat reduce the brown sugar by 2 tablespoons and increase the white sugar by the same amount. Fourth — baking sheets that were warm from a previous batch. Always use a cool room temperature baking sheet for each new batch.
Question 3: “Can I make salted caramel cookie dough ahead and freeze it?”
Salted caramel cookie dough freezes perfectly and having frozen cookie dough ready to bake is one of the greatest advantages a home baker can have. Scoop the dough into balls, place on a parchment lined tray and freeze until solid — about 2 hours. Transfer the frozen dough balls to a zip-lock bag and freeze for up to 3 months. Bake directly from frozen at 375 degrees F adding 2 to 3 minutes to the bake time. Add the flaky sea salt immediately after they come out of the oven. The caramel chocolate chunks freeze and bake beautifully with no change in their melting behavior — the caramel center will still be completely liquid at the time of eating.
Pro Tips for Perfect Sea Salt Caramel Cookies
Brown the butter every single time — it is a 5 minute step that makes the cookies taste twice as good and there is no acceptable reason to skip it.
Chill the dough overnight if you can — the difference between 1 hour chilled and 24 hours chilled is significant and worth the planning.
Keep the dough balls tall — resist the urge to flatten them before baking, a tall ball produces a thick chewy center.
The cookie scoop spinning trick immediately after baking is not optional if you want bakery-perfect round cookies — do it within 30 seconds of the tray coming out.
Flaky sea salt goes on immediately after baking while the surface is still soft and slightly tacky — wait even 2 minutes and it will not adhere properly.
Eat within 5 minutes of baking for the most dramatic caramel pull — the caramel firms significantly as it cools.
Irresistible Variations
Espresso Sea Salt Caramel Cookies: Add 1 tsp instant espresso powder to the dough — the coffee deepens the chocolate and caramel flavors to an extraordinary intensity.
White Chocolate Caramel Cookies: Replace the dark chocolate chunks with white chocolate chunks and use milk caramel instead of dark chocolate caramel bar — a sweeter blonde version of the same gooey pull.
Pretzel Caramel Cookies: Press small pretzel pieces into the top of the dough balls before baking alongside the chocolate chunks — the pretzel adds a crunchy salty element alongside the flaky salt that creates an extraordinary texture contrast.
Peanut Butter Caramel Cookies: Add 2 tablespoons of natural peanut butter to the dough and use peanut butter caramel cups chopped into the dough — the peanut butter caramel cookie combination is genuinely one of the best things in the world.
One Cookie. One Pull. One Moment That Changes Everything!
The Sea Salt Caramel Cookie is the cookie that ruins all other cookies for you permanently — once you have eaten a thick gooey caramel pull cookie still warm from the oven with flaky sea salt catching the light on every surface you will never be satisfied with a plain chocolate chip cookie again. Make them once and they go into permanent rotation.
Save this to your Pinterest board so you always have the recipe ready — and click the Visit Site button for the full printable recipe card at thekitchenettebite.com! 🍪🧂✨

Subscribe to our newsletter
Cook it before it’s trending