How to Make a Chocolate Covered Strawberry Bouquet — The Most Romantic Valentine's Day Gift That's Actually Edible!
COOKBOOK
DIY Chocolate Covered Strawberry Bouquet — Cheaper Than Flowers, Tastier Than Candy, and Absolutely Stunning!
By The Kitchenette Bite | Valentine’s Day Recipes | Edible Gift Ideas
Every February the flower shops charge triple the normal price, the candy boxes feel uninspired, and the restaurant reservations are impossible to get. But what if the most romantic, most impressive, most talked-about Valentine’s Day gift this year came straight from YOUR kitchen — and cost less than $20 to make?
Enter the Chocolate Covered Strawberry Bouquet. It looks exactly like a real flower bouquet — wrapped in tissue paper, tied with a satin ribbon bow — except every single “flower” is a plump ripe strawberry dipped in rich chocolate and decorated with drizzles, sprinkles, and edible glitter. It’s edible, it’s stunning, it’s personal, and it’s genuinely one of the most viral Valentine’s Day food gifts on all of Pinterest for good reason.
This step-by-step guide walks you through everything — how to dip, how to decorate, how to assemble the bouquet, and how to make it look like it came from a professional chocolatier. No experience needed whatsoever.
📌 This post also answers the TOP questions real people are asking on Reddit about chocolate covered strawberries — so you’ll have zero stress on Valentine’s Day! And click the Visit Site button to get the full printable recipe card with step-by-step photos!
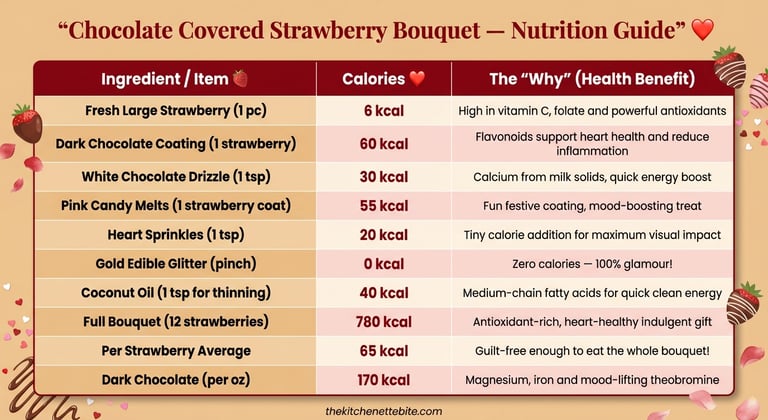
🛒 Ingredients List
For the Strawberries:
12 large fresh strawberries, washed and completely dried
8 oz dark chocolate chips or melting wafers
4 oz white chocolate chips or melting wafers
4 oz pink candy melts
1 tsp coconut oil (for thinning chocolate if needed)
For Decorating:
Red and pink heart sprinkles
Gold edible glitter or gold luster dust
Red nonpareils
Valentine’s Day themed sprinkle mix (optional)
Crushed freeze-dried strawberries (optional — adds gorgeous color and flavor)
For the Bouquet Assembly:
12 wooden skewers or lollipop sticks
1 sheet pink tissue paper
1 sheet kraft paper or white tissue paper
1 wide red or pink satin ribbon
1 small styrofoam block or floral foam (to hold the bouquet upright while chocolate sets)
Scissors and tape
👩🍳 Step-By-Step Instructions
Step 1: Prep Your Strawberries — This Step is Everything
Wash all 12 strawberries gently and then dry them with absolute thoroughness using paper towels. This is the single most important step in the entire recipe — any moisture on the surface of a strawberry will cause the chocolate to seize, streak, or slide right off. After patting dry, lay them on a paper towel-lined tray and let them air dry at room temperature for at least 30 minutes. Do not refrigerate them before dipping — cold strawberries cause condensation which again leads to chocolate problems. Room temperature, bone dry strawberries are your goal.
Insert a wooden skewer or lollipop stick carefully into the leafy green top of each strawberry, pushing it about halfway through the strawberry without coming out the other side. The stick needs to be secure enough to hold the strawberry while you dip and while the chocolate sets.
Step 2: Melt Your Chocolates
Melt each chocolate separately — dark, white, and pink — so you can work with all three. Place dark chocolate chips in a microwave-safe bowl and microwave in 30-second intervals, stirring thoroughly between each interval, until completely smooth and glossy. This usually takes 2–3 intervals. Add ½ tsp coconut oil if the chocolate feels too thick — it thins it to the perfect dipping consistency without affecting flavor. Repeat with white chocolate and pink candy melts in separate bowls. Keep all three warm while you work — if they start to thicken, microwave for 15 seconds and stir.
Step 3: Dip Your Strawberries
Now for the fun part! Hold each strawberry by the skewer and dip it into your chosen chocolate, letting it go about three-quarters of the way up the strawberry. Lift it straight up and let the excess chocolate drip off by holding it above the bowl for 5–10 seconds and gently twirling the skewer. Stick the skewer into your styrofoam block so the strawberry stands upright while the chocolate sets — this prevents flat spots and gives you a perfectly round chocolate coating all the way around.
Vary your dipping across the 12 strawberries — dip 5 in dark chocolate, 4 in pink candy melts, and do 3 as tuxedo style (dip in dark chocolate first, let set completely, then dip the sides in white chocolate to create the tuxedo lapel effect).
Step 4: Decorate While Chocolate is Still Wet
Working quickly before the chocolate sets, add your decorations. For the dark chocolate dipped ones, use a fork or piping bag to drizzle white chocolate in elegant back-and-forth zigzag lines across the top. For the pink ones, immediately roll the bottom edges in heart sprinkles or nonpareils. For the tuxedo ones, use a toothpick dipped in white chocolate to draw three small buttons down the center. Dust ALL of them lightly with gold edible glitter using a dry clean brush — this one step is what makes them look truly professional and extraordinary.
Step 5: Let the Chocolate Set Completely
Leave all 12 strawberries standing upright in the styrofoam block at room temperature for 30–45 minutes until the chocolate is fully hardened. Do not put them in the refrigerator to speed this up — the temperature change causes condensation and a dull white bloom on the chocolate surface. Room temperature setting gives you that gorgeous glossy finish every time.
Step 6: Assemble the Bouquet
Lay a sheet of pink tissue paper flat on your counter. Place a sheet of kraft paper on top at a slight angle. Gather the paper up around your hand to form a cone shape — this is the bouquet wrapper. Pull your chocolate covered strawberry skewers out of the styrofoam block and arrange them like a real flower bouquet — tallest in the center, shorter ones fanning out on the sides, varying the colors and decorations so the arrangement looks intentional and full. Hold the bunch of skewers together and slide them into your paper cone. Adjust until the arrangement looks beautiful from the front — the strawberries should fan out like a bouquet of roses. Wrap the satin ribbon around the base of the paper cone several times and tie it in a large generous bow. Trim the bottom of the paper cone at an angle with scissors for a clean professional finish.
🙋 Top Chocolate Covered Strawberry Questions from Reddit — Answered!
❓ Reddit Q1: “Why does my chocolate look streaky and dull instead of glossy after it sets?”
This is the most frustrating chocolate covered strawberry problem and it has two main culprits. The first is moisture — as we mentioned, even a tiny bit of water on the strawberry surface or in your melted chocolate causes streaking and a matte finish. The second is temperature shock — putting warm freshly dipped strawberries in the fridge causes condensation to form on the chocolate surface as it cools too quickly, creating that dull white streaky appearance called chocolate bloom. The solution is always to let chocolate set at room temperature and to ensure your strawberries are completely dry and at room temperature before dipping. Using proper chocolate melting wafers or adding a small amount of coconut oil to regular chocolate chips also helps achieve that professional glossy finish.
❓ Reddit Q2: “How far in advance can I make chocolate covered strawberries and how do I store them?”
Chocolate covered strawberries are best made the day of or at most one day ahead. Fresh strawberries contain a lot of moisture and they start to weep and soften after about 24 hours which can make the chocolate coating slide or crack. If you must make them ahead, make them the morning of Valentine’s Day and store them at room temperature in a single layer — not stacked — in a container with the lid slightly ajar to allow airflow. Do NOT store them in an airtight container as trapped moisture will ruin the chocolate. If you need to refrigerate them, place them uncovered on a parchment-lined tray and let them come back to room temperature for 20–30 minutes before serving or gifting.
❓ Reddit Q3: “What’s the best chocolate to use for dipping strawberries — chips, bars, or melting wafers?”
All three work but they give different results. Melting wafers (like Ghirardelli or Wilton brand) are specifically designed for dipping and coating — they melt smoothly, thin to the perfect consistency, and set with a beautiful glossy finish. They are the easiest and most beginner-friendly option by far. Chocolate chips work well too but often need a teaspoon of coconut oil added to thin them to dipping consistency — without it they can be too thick and give an uneven coating. Chocolate bars (like a good quality dark chocolate bar) give the best FLAVOR of all three options and melt beautifully but require proper tempering technique for that professional snap and shine. For a first time maker, melting wafers are the clear recommendation — they are forgiving, easy, and give gorgeous results every time.
💡 Pro Tips for a Stunning Strawberry Bouquet
Always buy the largest strawberries you can find — they look more impressive in the bouquet and are easier to dip without getting your fingers in the chocolate.
Make sure all your decorating supplies (sprinkles, glitter, piping bags) are laid out and ready BEFORE you start dipping — chocolate sets faster than you think and you need to decorate immediately.
Vary the decoration on each strawberry — no two should look identical. The variety is what makes the bouquet look abundant, intentional, and professionally made.
Gold edible glitter is the single most impactful upgrade you can make — it costs about $5 and makes everything look like it came from a luxury chocolatier.
Practice your drizzle technique on parchment paper first before drizzling on your actual strawberries — a steady hand and confident movement gives cleaner lines.
When assembling the bouquet keep turning it as you add strawberries — look at it from all angles to make sure it looks full and balanced from every direction.
🎁 More Ways to Gift Your Strawberry Bouquet
Valentine’s Box: Skip the bouquet wrapping and arrange the finished strawberries in a heart-shaped box lined with pink tissue paper — gorgeous alternative presentation.
Mini Bouquets: Make three smaller bouquets of 4 strawberries each instead of one large bouquet — perfect for gifting to multiple people like a mom, sister, and best friend.
Dessert Centerpiece: Arrange the bouquet in a mason jar or small vase as a centerpiece for your Valentine’s dinner table — stunning and then everyone gets to eat the centerpiece!
Gift Basket Addition: Tuck a smaller bouquet of 6 strawberries into a Valentine’s gift basket alongside champagne, chocolates, and candles for the ultimate romantic gift.
💕 The Most Romantic Edible Gift You’ll Ever Give
Whether you’re making this for your partner, your best friend, your mom, or yourself — because you absolutely deserve it — this Chocolate Covered Strawberry Bouquet is going to stop everyone in their tracks. It’s the kind of gift that makes people say “you MADE this?!” and then immediately ask you to make one for them too.
Save this to your Pinterest board so you have it every Valentine’s Day going forward — and click the Visit Site button for the full printable recipe card with step-by-step photos at thekitchenettebite.com! 🍓💕
Subscribe to our newsletter
Cook it before it’s trending