Cheesecake Stuffed Strawberries: The 10-Minute Valentine's Treat
COOKBOOK
🍓 Cheesecake Stuffed Strawberries: The 10-Minute Valentine’s Treat
The Hook That’ll Make You Obsessed
Listen. If you’ve been making chocolate-covered strawberries every Valentine’s Day like it’s 2005, I need you to sit down for this.
These taste like a bite-sized strawberry cheesecake, but take 10 minutes to make.
No oven. No waiting. No fancy equipment. Just the most show-stopping, creamy, crunchy, fresh dessert that looks like you spent hours when you actually spent less time than it takes to watch a TikTok spiral.
The secret? The Inside-Out Look: Bright red berry + fluffy white cream + golden graham cracker dust = instant Valentine’s magic.
⏱️ Quick Stats
Prep Time: 15 minutes
Chill Time: 20 minutes
Total Time: 35 minutes (but only 15 minutes of actual work)
Servings: About 20 stuffed strawberries
Skill Level: Beginner-friendly (if you can use a spoon, you can do this)
🎯 Why This Recipe is Different
The “Graham Cracker Rim” Secret:
Here’s the game-changer nobody tells you: After you pipe the cheesecake filling, you dip the wet cream cheese end directly into crushed graham crackers.
Why this matters:
Adds the essential cheesecake “crust” crunch
Prevents the filling from looking messy or naked
Creates a professional bakery finish
Keeps your fingers clean when you eat them
This one trick transforms these from “cute” to “I NEED THE RECIPE.”
🛒 The Grocery List (3 Main Ingredients + 2 Extras)
The Must-Haves:
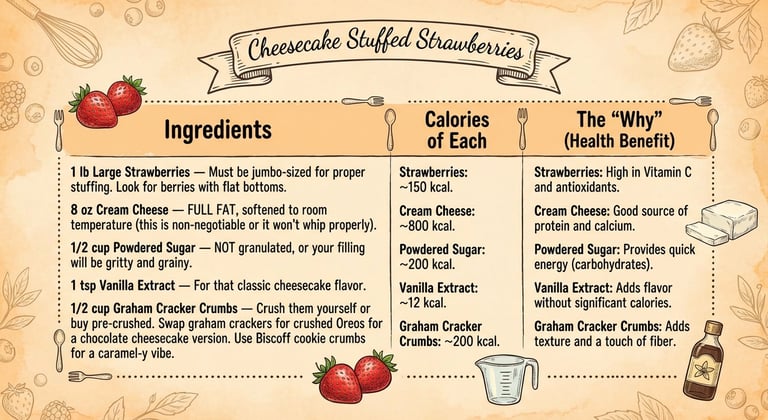
1 lb Large Strawberries — Must be jumbo-sized for proper stuffing. Look for berries with flat bottoms.
8 oz Cream Cheese — FULL FAT, softened to room temperature (this is non-negotiable or it won’t whip properly)
1/2 cup Powdered Sugar — NOT granulated, or your filling will be gritty and grainy
1 tsp Vanilla Extract — For that classic cheesecake flavor
1/2 cup Graham Cracker Crumbs — Crush them yourself or buy pre-crushed
Optional Twist:
Swap graham crackers for crushed Oreos for a chocolate cheesecake version
Use Biscoff cookie crumbs for a caramel-y vibe
📊 The Smart Breakdown: What Makes These Perfect
Texture Profile:
Juicy: Fresh strawberry exterior with natural sweetness
Creamy: Whipped cheesecake filling that’s cloud-like and tangy
Crunchy: Graham cracker coating adds the essential “crust” element
Make-Ahead Durability:
Best: Same-day assembly, eaten within 4 hours
Good: Made up to 4 hours ahead, stored in fridge
Not Recommended: Overnight (strawberries release moisture and get soggy)
Dietary Flexibility:
Gluten-Free Option: Use gluten-free graham crackers or crushed GF cookies
Keto Option: Use monk fruit sweetener instead of powdered sugar + almond flour coating
Lower Sugar: Reduce powdered sugar to 1/4 cup (they’ll be less sweet but still delicious)
👩🍳 THE INSTRUCTIONS: From Zero to Hero
Step 1: The Prep (Hulling the Strawberries)
This is where most people mess up, so pay attention.
What to do:
Wash and completely dry your strawberries with paper towels
Use a sharp paring knife to cut around the green stem/leaves and remove them
Insert the knife tip into the top center of the berry at an angle
Carve out a cone-shaped cavity, removing the white core
The Critical Rule:
Do NOT pierce through the bottom of the strawberry
Leave at least 1/4 inch of strawberry at the base as your “cup bottom”
If you go through, the filling will leak out everywhere
Pro Tip: Test your first strawberry by holding it upside down. If you see light through a hole, you went too deep.
Step 2: The Drying (The Most Important Step You’ll Skip)
Why this matters: Wet berries = sliding, runny filling that won’t stay put.
What to do:
After hulling, use a twisted paper towel corner to pat the INSIDE of each berry completely dry
Let them sit upside down on paper towels for 5 minutes to drain any excess moisture
This seems annoying but it’s the difference between Pinterest-perfect and Pinterest-fail
Step 3: The “Fluff” Whip (Making the Filling)
Ingredients for the filling:
8 oz cream cheese (softened)
1/2 cup powdered sugar
1 tsp vanilla extract
What to do:
In a medium bowl, beat the cream cheese with an electric mixer for 1–2 minutes until completely smooth
Add powdered sugar and vanilla
Beat on medium-high speed for 2–3 minutes until the mixture is FLUFFY and holds stiff peaks
It should look like thick frosting, not loose cream
The Test: When you lift the beaters, the filling should stand up in peaks, not flop over.
Why this matters: Under-beaten filling = runny, sad strawberries that deflate. Properly whipped filling = stable, gorgeous presentation.
Step 4: The Piping Hack (No Fancy Tools Needed)
If you have a piping bag:
Use a large star tip for a fancy look
Fill the bag halfway (don’t overfill or it’ll explode)
If you DON’T have a piping bag (most of us):
Grab a gallon-size Ziploc bag
Spoon the filling into one bottom corner
Twist the top of the bag to push filling down
Snip off 1/2 inch from the corner with scissors
Boom. DIY piping bag.
What to do:
Hold the strawberry in one hand, piping bag in the other
Pipe filling into the cavity, filling it completely
Continue piping a small swirl ABOVE the strawberry opening (this is what you’ll dip)
The cream should mound slightly over the top
Step 5: The “Dip” (The Graham Cracker Magic)
What to do:
Put your graham cracker crumbs in a shallow bowl
Immediately after piping each strawberry, while the cream is still fresh and sticky
Gently dip just the cream cheese top into the graham cracker crumbs
Press lightly so the crumbs stick
Lift and let excess crumbs fall off
The Specific Motion:
Don’t dunk the whole strawberry
Don’t twist it around
Just a straight down press into the crumbs, then straight up
Why now: If you wait, the cream cheese surface will dry and the crumbs won’t stick.
Step 6: The Chill (Patience Pays Off)
What to do:
Place finished strawberries on a parchment-lined plate or tray
Don’t let them touch each other
Cover loosely with plastic wrap
Refrigerate for at least 20 minutes before serving
Why this matters:
The filling firms up and becomes sliceable
The flavors meld together
They’re easier to pick up and eat without the filling squishing out
Serving Temperature: Take them out of the fridge 5 minutes before serving so they’re not ice-cold (room temp cream cheese tastes better).
🚨 Reddit-Inspired Troubleshooting: The Top 3 Complaints (SOLVED)
I’ve read through hundreds of comments on r/Baking, r/DessertPorn, and TikTok. Here are the disasters people encounter — and exactly how to avoid them.
Problem #1: “The filling ran out everywhere!”
What went wrong:
You used low-fat or reduced-fat cream cheese (it has more water content and won’t hold structure)
You didn’t beat the mixture long enough to create stiff peaks
Your cream cheese wasn’t at room temperature, so it stayed lumpy instead of whipping
The Fix:
Always use FULL-FAT cream cheese (the brick kind, not spreadable)
Beat for a full 2–3 minutes until it looks like thick frosting
Let cream cheese sit out for 30–60 minutes before using
Test: If the filling drips off a spoon, keep beating
Problem #2: “The strawberries got mushy and gross!”
What went wrong:
You made them more than 4 hours in advance
Fresh strawberries release moisture over time, which makes them soggy
The cream cheese filling also adds moisture that breaks down the berry walls
The Fix:
Assemble these MAX 4 hours before serving
If you must prep ahead, hull and dry the strawberries, make the filling, but keep them separate
Stuff them 1–2 hours before your event for best results
Store in the fridge on paper towels to absorb any moisture
Best Practice: These are same-day desserts. Don’t try to make them the night before.
Problem #3: “They kept falling over on the plate!”
What went wrong:
You picked strawberries with pointy bottoms
The strawberries are top-heavy with filling and can’t balance
The Fix:
At the store, choose strawberries with flat bottoms (they look like they can stand up on their own)
If your strawberries are pointy: Use a sharp knife to slice off a TINY bit (1–2mm) from the bottom tip to create a flat base
Make sure you don’t cut so much that you create a hole
Test each berry by setting it upright before stuffing
Pro Styling Tip: Arrange them standing up on a white platter for that professional bakery look.
💡 Extra Tips from a Dessert Obsessive
Flavor Variations:
Lemon Cheesecake: Add 1 tsp lemon zest and 1 tbsp lemon juice to the filling
Chocolate Drizzle: After chilling, drizzle melted chocolate over the top
Brownie Batter: Mix 1 tbsp cocoa powder into the filling + use Oreo crumbs
Cinnamon Sugar: Skip graham crackers and roll in cinnamon-sugar instead
Presentation Ideas:
Serve on a marble board with fresh mint leaves
Dust with extra powdered sugar right before serving
Add edible flowers for a fancy brunch vibe
Package in clear boxes with ribbons for Valentine’s gifts
Storage Reality Check:
Fridge: Up to 4 hours (best quality)
Counter: Maximum 1 hour (cream cheese is perishable)
Freezer: Don’t even think about it (strawberries turn to mush)
🎀 The Final Word
These Cheesecake Stuffed Strawberries are what happens when you take a classic dessert and make it easier, faster, and honestly better.
No baking. No tempering chocolate. No stress.
Just fresh fruit, fluffy cream, and that satisfying crunch that makes every bite feel like you’re eating a tiny cheesecake.
Make them for Valentine’s Day. Make them for brunch. Make them because it’s Tuesday and you deserve something beautiful.
Total active time? 15 minutes.
Total compliments? Countless.
Now go grab those strawberries and become the dessert hero you were always meant to be.
Subscribe to our newsletter
Cook it before it’s trending