Bridgerton Blue Velvet Cake — The Most Stunning Cake on Pinterest Right Now!
COOKBOOK
Bridgerton Blue Velvet Layer Cake — The Most Elegant Cake on Pinterest This Season!
By The Kitchenette Bite | Bridgerton Tea Party Recipes | Layer Cake Tutorials
If the Bridgerton family hosted a tea party and served a cake, it would be this one. The Bridgerton Blue Velvet Layer Cake is four layers of impossibly vivid royal blue velvet cake — tender, buttery and deeply colored — filled with ivory ermine buttercream and a hidden layer of ruby red cherry compote, finished in a semi-naked style that lets the blue layers peek through the white frosting in the most dramatically beautiful way, and decorated with gold leaf, dried blue cornflowers, and ivory ranunculus that would look completely at home in a Regency-era ballroom.
Blue velvet cake is the upgrade that the classic red velvet has been waiting for. Same technique, same buttermilk tang, same incredibly tender velvet crumb — but the color is a show-stopping deep royal blue that makes every single person who sees it stop, stare, and reach for their phone. The cherry compote hidden between the layers is the secret detail that makes every slice a surprise — a thin vivid ruby red stripe revealed only when the cake is cut, providing a bright fruity contrast to the rich blue cake and the smooth ivory frosting that is as delicious as it is beautiful.
📌 This post covers the complete blue velvet cake technique, the ermine buttercream recipe, the cherry compote filling, and the TOP Reddit questions about velvet cakes — all answered! Click the Visit Site button for the full printable recipe card!
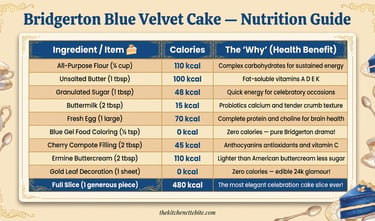
🛒 Ingredients List
For the Blue Velvet Cake Layers (makes four 8-inch layers):
3 cups all-purpose flour
1 tsp baking soda
1 tsp salt
2 tbsp unsweetened cocoa powder
1 cup unsalted butter, softened
2 cups granulated sugar
4 large eggs, room temperature
1 cup buttermilk, room temperature
½ cup sour cream, room temperature
2 tsp vanilla extract
1 tbsp white vinegar
Royal blue gel food coloring — approximately 2 tsp (adjust for desired depth)
A few drops of violet gel food coloring (prevents blue from reading green)
For the Ermine Buttercream:
2 cups whole milk
½ cup all-purpose flour
2 cups granulated sugar
2 cups unsalted butter, softened to exactly room temperature
2 tsp vanilla extract
Pinch of salt
For the Cherry Compote Filling:
2 cups fresh or frozen dark cherries, pitted
¼ cup granulated sugar
2 tbsp lemon juice
1 tsp cornstarch mixed with 1 tbsp cold water
For Decoration:
Gold leaf sheets (edible 24k)
Dried blue cornflowers
Fresh or dried ivory ranunculus or white flowers
Small golden dried flowers
White chocolate for drizzle (optional)
👩🍳 Step-By-Step Instructions
Step 1: Make the Blue Velvet Cake Layers
Preheat oven to 350°F and prepare four 8-inch round cake pans with butter and parchment. Whisk together the flour, baking soda, salt, and cocoa powder in a bowl — the cocoa powder is not for chocolate flavor, it is for the classic velvet cake chemical reaction that gives the crumb its signature tender texture. Beat butter and sugar together on high speed for 4 minutes until pale and very fluffy. Add eggs one at a time beating well after each. In a separate bowl combine the buttermilk, sour cream, vanilla, white vinegar, and a generous amount of royal blue gel food coloring — start with 1½ tsp and adjust. Add 3 to 4 drops of violet gel coloring to the liquid mixture — this counteracts the green undertone that blue food coloring develops when baked, keeping your layers a true vivid royal blue rather than teal or sage. Alternate adding the flour mixture and the buttermilk mixture to the butter base in three additions beginning and ending with flour. Divide evenly between the four pans and bake for 22–25 minutes. Cool completely before frosting — refrigerate overnight for best results.
Step 2: Make the Ermine Buttercream
Ermine buttercream is the traditional frosting for velvet cakes — less sweet than American buttercream, silkier than Swiss meringue, and it pipes and spreads with an elegance that perfectly suits a Bridgerton-worthy cake. Whisk the flour into the cold milk in a small saucepan until completely smooth with no lumps. Add sugar and cook over medium heat stirring constantly until the mixture thickens to a very thick pudding consistency that holds its shape when a spoon is dragged across the bottom — this takes approximately 8–10 minutes. Transfer to a bowl, press plastic wrap directly onto the surface, and cool completely to room temperature — this is critical, even slightly warm pudding will melt the butter. Beat the room temperature butter on high speed for 5 minutes until incredibly fluffy and pale. Add the completely cooled pudding mixture one tablespoon at a time, beating continuously — the buttercream will look broken and curdled at first, keep beating and it will come together into the smoothest most silky frosting you have ever tasted.
Step 3: Make the Cherry Compote
Combine cherries, sugar, and lemon juice in a small saucepan over medium heat. Cook for 8 minutes until the cherries have released their juices and softened. Add the cornstarch slurry and cook for 2 more minutes until the compote is thick and glossy. Cool completely and refrigerate until cold before using — warm compote will slide between cake layers and destabilize the entire cake.
Step 4: Layer and Frost the Cake
Place the first cake layer on the marble stand. Pipe a border of ermine buttercream around the outer edge of the layer — this dam prevents the cherry compote from bleeding outward. Spread the cherry compote inside the dam border in a thin even layer. Add the second cake layer and press gently. Continue stacking with plain ermine buttercream between the remaining layers — the cherry compote only goes between the bottom two layers as the hidden surprise detail. Apply a thin crumb coat of buttercream over the entire outside and refrigerate for 20 minutes until firm. Apply the final semi-naked coat — thick enough to be beautiful but deliberately scraped back on the sides to reveal glimpses of the vivid blue layers beneath. The top receives a fuller coverage that gets decorated.
Step 5: Decorate With Gold Leaf and Florals
Once the final buttercream layer has chilled for 15 minutes begin the decoration. Gold leaf: use a dry clean brush to lift individual gold leaf sheets and press them gently against the frosting surface — they adhere immediately on contact with the slightly tacky buttercream. Layer 3 to 4 sheets in an asymmetric cascade down one side of the cake. Florals: arrange the dried blue cornflowers, ivory ranunculus, and golden dried flowers in an asymmetric spray across the top of the cake extending slightly over one edge — the combination of blue flowers on blue cake with gold accents is pure Bridgerton magic. Drizzle white chocolate from a small piping bag in elegant thin lines across the decorated top if desired.
🙋 Top Blue Velvet Cake Questions from Reddit — Answered!
❓ Reddit Q1: “Why does my blue velvet cake turn green or teal when baked instead of staying blue?”
Blue food coloring turning green during baking is the most common and most frustrating blue velvet cake problem and it happens because blue gel coloring has a slightly yellow undertone that reacts with the heat and the small amount of cocoa powder in the batter to shift toward teal or green. The fix is simple and completely reliable: add 2 to 3 drops of violet or purple gel food coloring to your batter alongside the blue. Violet sits opposite yellow on the color wheel and neutralizes the yellow undertone — the result is a vivid true royal blue that stays blue throughout baking and cooling. The amount of violet needed is very small, just enough to neutralize — too much shifts the color purple. Start with 2 drops and adjust in future batches based on your specific brand of blue coloring. Brands vary significantly in undertone — Americolor Royal Blue with a touch of Americolor Violet gives the most reliable true blue result.
❓ Reddit Q2: “What is ermine buttercream and why is it better for velvet cakes than regular buttercream?”
Ermine buttercream — also called flour buttercream, boiled milk frosting, or heritage frosting — is the original traditional frosting for both red and blue velvet cakes before cream cheese frosting became standard. It is made by cooking flour and milk into a thick pudding, cooling it completely, and then beating it into whipped butter. The result is a frosting that is significantly less sweet than American buttercream, incredibly silky and smooth with almost a whipped cream texture, and bright white in color which creates the most beautiful contrast against vivid blue velvet layers. It is also considerably more stable in warm environments than cream cheese frosting and holds its shape better for decorated cakes. Many velvet cake enthusiasts consider ermine the superior frosting for velvet cakes in every way — it lets the flavor of the cake itself come through rather than overwhelming it with sweetness.
❓ Reddit Q3: “Can I make a blue velvet cake ahead of time and how do I store it without the color fading?”
Blue velvet cake is an excellent make-ahead cake — the layers can be baked up to 3 days ahead, wrapped tightly in plastic wrap and refrigerated, and the flavors and color actually intensify over the first 24 hours. The fully assembled frosted cake keeps refrigerated for up to 3 days before serving — bring to room temperature for 45 minutes before slicing as cold buttercream is dense and loses its silky texture. The blue color does not fade in the refrigerator but can be affected by light — store in an airtight cake box or container rather than loosely covered. The cherry compote filling is the element that benefits most from being made ahead — overnight refrigeration allows the compote to thicken further and the flavors to deepen into a richer more complex fruit filling.
💡 Pro Tips for the Most Beautiful Blue Velvet Cake
Always add violet gel coloring alongside blue to prevent the dreaded green bake — this single tip separates successful blue velvet bakers from frustrated ones.
Room temperature dairy is non-negotiable for velvet cake — cold buttermilk and eggs create a curdled batter that produces an uneven crumb.
The ermine buttercream pudding base must be completely cool before adding to the butter — even slightly warm it will melt the butter and create a soupy unusable mess.
Semi-naked finish is forgiving for beginners — the deliberately scraped look requires less precision than a fully smooth coat and looks more artisan and intentional.
Apply gold leaf last — after all other decorations are in place — as it is extremely delicate and tears if other elements brush against it.
The cherry compote dam border is essential — without it the compote migrates outward under the weight of the upper layers and creates a structural instability that causes the cake to slide.
👑 More Bridgerton-Inspired Variations
Bridgerton Lavender Honey Cake: Replace blue coloring with soft lavender, swap cherry compote for honey lemon curd filling, and decorate with dried lavender and gold leaf — the softest most romantic Bridgerton cake imaginable.
Lady Whistledown Lemon Cake: White velvet layers with lemon curd filling and white ermine buttercream — decorated with silver leaf and white flowers for the anonymous gossip columnist aesthetic.
Bridgerton Strawberry Rose Cake: Pale blush pink velvet layers with fresh strawberry compote and rose water buttercream — the most romantic Valentine’s and bridal shower cake in existence.
Anthony Bridgerton Bee Cake: Deep gold velvet layers with honey buttercream and a honeycomb chocolate decoration on top — for the most dedicated Bridgerton fans.
🎂 The Bridgerton Cake That Will Make Your Tea Party Legendary!
Whether you are hosting a Bridgerton viewing party, a bridal shower tea, a spring birthday celebration, or simply want to create the most beautiful cake you have ever served — this Bridgerton Blue Velvet Layer Cake delivers a level of elegance and drama that makes every other dessert on the table pale in comparison.
Save this to your Pinterest board so you have the complete tutorial for every Bridgerton occasion — and click the Visit Site button for the full printable recipe card at thekitchenettebite.com! 👑🎂

Subscribe to our newsletter
Cook it before it’s trending