Better Than Gummy Bears: Homemade Candied Orange Peels That Are Chewy, Sweet & Actually Good for You
COOKBOOK
⏱️ Time Investment
Prep Time: 20 minutes
Cook Time: 2 hours 15 minutes
Drying Time: 8–12 hours (or overnight)
Total Time: 10–14 hours (mostly hands-off)
Yield: About 3 cups (enough for 6–8 gift bags)
🔐 The “Secret” That Changes Everything
The Triple-Blanch Method™: Most recipes blanch once or not at all — then wonder why their peels taste like eating a candle. The secret? Boiling and draining THREE times pulls out the bitter compounds in the pith while keeping the essential oils that give you that “expensive perfume” orange flavor. It’s the difference between a $2 gas station candy and a $18 artisan confection.
🛒 Your Grocery List (USA Measurements)
The Main Players:
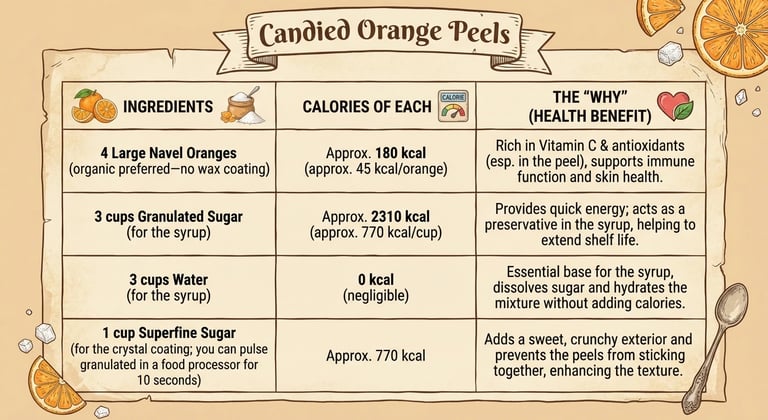
4 Large Navel Oranges (organic preferred — no wax coating)
3 cups Granulated Sugar (for the syrup)
3 cups Water (for the syrup)
1 cup Superfine Sugar (for the crystal coating; you can pulse granulated in a food processor for 10 seconds)
The Optional Upgrade:
8 oz Dark Chocolate (60–70% cacao for dipping)
Flaky Sea Salt (just a pinch on the chocolate — trust me)
📊 The “Smart” Breakdown Table
Nutrient ComparisonCandied Orange Peel (1 oz)Sour Gummy Worms (1 oz)Vitamin C12mg (13% DV)0mgFiber2g0gNatural Essential Oils✅ Limonene (anti-inflammatory)❌ Artificial flavoringAdded Sugar~18g~19gActual Fruit Content100%0%
Dietary Wins: ✅ Vegan
✅ Gluten-Free
✅ No Artificial Dyes
✅ No High Fructose Corn Syrup
⚠️ Contains Sugar (but you knew that)
🍊 PART 3: INSTRUCTIONS (From “Trash” to Treasure)
STEP 1: The Prep Work (Creating Beautiful Strips)
Why this matters: Chunky, irregular pieces look homemade in a bad way. Long, elegant strips? That’s Williams Sonoma energy.
The Technique:
Wash your oranges under hot water with a vegetable brush. You’re eating the outside part — get that grocery store grime off.
Score the orange from top to bottom (stem to navel) into quarters, cutting ONLY through the peel, not into the flesh. Think of drawing longitude lines on a globe.
Peel away each quarter in one piece. Use your thumb to gently work between the peel and the fruit. You want the white pith attached — that’s where the pectin lives, and it’s what makes them chewy.
The Pith Decision: Don’t scrape it all off like you’re defusing a bomb. A thin layer (about 1/8 inch) is perfect. If your pith is thicker than a nickel, use a spoon to gently scrape away the excess. Too much pith = bitter city. Too little = they’ll be tough and leathery.
Slice into strips: Lay each quarter peel flat, white side down. Cut lengthwise into 1/4-inch strips. Use a ruler if you’re Type A like me. Uniform size = even cooking.
Pro Move: Save the orange flesh for eating or juicing. You just made breakfast and dessert from one piece of fruit. That’s the zero-waste dream.
STEP 2: The “De-Bittering” Process (The Triple Blanch)
The Science: Orange peels contain bitter compounds called limonoids in the pith. Heat breaks them down and pulls them into the water. Each blanch removes another layer of bitterness.
The Process:
First Blanch: Place all your peel strips in a medium saucepan. Cover with cold water (about 4 cups). Bring to a rolling boil over high heat. Boil for 2 minutes. The water will turn slightly yellow and smell intensely orange-y.
Drain completely in a colander. Rinse the peels under cold water for 10 seconds. Dump out the water from the pan — it’s bitter extract.
Second Blanch: Return peels to the pan. Add fresh cold water. Boil again for 2 minutes. The water will still be yellowish but lighter.
Drain and rinse again.
Third Blanch: Fresh water, one more time. Boil for 3 minutes this time. The water should be almost clear now.
Drain one final time. Give them a gentle squeeze (don’t wring them out like a towel — just a light press) to remove excess water.
What You Should Notice: Taste a tiny piece of peel now. It should taste orange-y and slightly vegetal, but NOT mouth-puckeringly bitter. If it still tastes like you’re chewing an air freshener, do a 4th blanch.
STEP 3: The Sugar Bath (The Transformation)
The Goal: Turn firm peels into translucent, candy-like strips. This is where the magic happens.
The Syrup:
In the same saucepan (one-pot wonder), combine:
3 cups granulated sugar
3 cups water
Stir over medium heat until the sugar completely dissolves. You should see zero sugar crystals on the side of the pan. This takes about 3–4 minutes.
Add your blanched peels to the syrup. They should be completely submerged. If they’re floating like little orange life rafts, press them down with a spoon occasionally.
Bring to a gentle simmer (tiny bubbles around the edges, not a rolling boil). Reduce heat to medium-low.
Simmer uncovered for 1 hour and 45 minutes to 2 hours, stirring every 20 minutes to prevent sticking.
What to Watch For:
At 1 hour: Peels will start to look slightly translucent around the edges.
At 1.5 hours: They’ll have that “stained glass window” look — you can almost see through them.
At 2 hours: They’re deeply translucent, the syrup has thickened considerably, and the peels look glossy and jewel-like.
Temperature Check: If you have a candy thermometer, the syrup should reach around 220°F (thread stage). No thermometer? Dip a spoon in the syrup and let it drip back into the pot — it should fall in a slow, thick stream, not watery droplets.
The Safety Net: If your syrup gets too thick before the peels are translucent, add 1/4 cup hot water and continue simmering.
STEP 4: The Drying Phase (The Make-or-Break Step)
Why Everyone Messes This Up: They get impatient. Wet peels + sugar coating = a dissolved, sticky mess within 2 hours.
The Method:
Drain the peels in a fine-mesh strainer set over a bowl. Let them sit for 5 minutes so excess syrup drips off. (Save that syrup! It’s orange simple syrup — killer in cocktails or drizzled on pound cake.)
Prepare your drying station:
Line 2 baking sheets with parchment paper or silicone mats (NOT wax paper — they’ll stick).
Spray lightly with cooking spray or brush with a tiny bit of neutral oil.
Arrange peels in a single layer, not touching. They’ll still be sticky — that’s normal.
Drying Options: Option A (Overnight Method): Leave them at room temperature for 10–12 hours. Point a fan at them if you have one. They should go from sticky to tacky to slightly dry. Option B (Oven Method): Place in a 170°F oven (or your lowest setting) for 2–3 hours, flipping every 45 minutes. Leave the oven door cracked open with a wooden spoon. Option C (Dehydrator): 135°F for 3–4 hours.
The Touch Test:
They’re ready when:
They feel slightly tacky but don’t leave syrup residue on your fingers
You can pick one up without it sticking to the parchment
They’re pliable, not rigid (they’ll firm up more after sugar coating)
Red Flag: If they’re still leaving wet spots on the parchment, give them more time.
STEP 5: The “Crystal Coat” (Pinterest-Worthy Finish)
The Visual: This is where they go from “homemade candy” to “could sell these at a farmer’s market for $12 a bag.”
The Technique:
Pour 1 cup superfine sugar into a wide, shallow bowl. (Superfine dissolves less and gives you that professional sparkle. Regular granulated works but looks chunkier.)
Working in batches of 5–6 strips at a time, toss the peels in the sugar. Use your hands to massage the sugar into every crevice. You want full coverage.
Shake off excess sugar and transfer to a clean parchment-lined baking sheet in a single layer.
Let them sit for 30 minutes to let the coating set.
The Optional Upgrade (Chocolate-Dipped):
If you’re feeling fancy:
Melt 8 oz dark chocolate (I use the double boiler method or microwave in 20-second bursts).
Dip each peel halfway into the chocolate, letting the excess drip off.
Place on parchment. Sprinkle with flaky sea salt while the chocolate is still wet.
Refrigerate for 15 minutes to set the chocolate.
STEP 6: Storage (Keeping Them Soft & Perfect)
The Problem: Candied peels can dry out and turn into orange-flavored wood chips, or they can get soggy and weep syrup.
The Solution:
Short-Term (Up to 2 Weeks):
Store in an airtight container (glass jars or plastic containers with tight lids)
Layer with parchment paper between layers to prevent sticking
Keep at room temperature in a cool, dry spot (not the fridge — moisture will make them weep)
Long-Term (Up to 2 Months):
Freeze in freezer bags with the air pressed out
Thaw at room temperature for 1 hour before serving
Chocolate-Dipped Version:
Store in the fridge in an airtight container for up to 3 weeks
Let sit at room temperature for 10 minutes before eating (cold chocolate is hard on your teeth)
The Reviving Trick: If they dry out, place a piece of bread in the container overnight. The peels will absorb the moisture from the bread. Remove the bread in the morning.
🍊 PART 4: REDDIT-INSPIRED TROUBLESHOOTING
❌ Problem #1: “Why Are My Peels Rock Hard?”
Reddit Says: “I followed the recipe exactly and they came out like orange-flavored glass shards. What the hell?”
What Went Wrong:
You over-cooked them in the sugar syrup. When the temperature goes too high (above 230°F), you’re making hard candy, not candied peel. The sugar crystallizes and firms up like a jawbreaker.
The Fix:
Keep your simmer gentle — you want lazy bubbles, not a rolling boil
If you don’t have a thermometer, watch the bubbles: they should be the size of dimes, not quarters
Don’t let the syrup reduce too much. If it looks like honey instead of maple syrup, you’ve gone too far
The Save: If they’re already hard, you can re-simmer them in a fresh batch of simple syrup (1:1 sugar to water) for 20 minutes to soften them back up.
❌ Problem #2: “Why Are They Still Bitter?”
Reddit Says: “These taste like I’m eating potpourri. I thought they were supposed to be candy???”
What Went Wrong:
You either:
Skipped the blanching steps entirely (don’t be that person)
Only blanched once (that’s not enough)
Used oranges with super thick pith and didn’t remove enough
The Fix:
Always blanch 3 times minimum — this is non-negotiable
If you’re using thick-skinned oranges (like Valencias), remove more pith than you think you need
Taste a piece after blanching but before the sugar bath. If it’s bitter then, it’ll be bitter forever. Do another blanch.
The Variety Hack: Navel oranges have the best peel-to-pith ratio. Blood oranges are beautiful but can be more bitter. Seville oranges? Those are for marmalade — way too bitter for candying.
❌ Problem #3: “Why Did the Sugar Coating Melt Off?”
Reddit Says: “They looked perfect for 2 hours, then turned into a sticky, granulated mess in the jar. Did I get scammed by a recipe?”
What Went Wrong:
You rushed the drying phase. Wet peels dissolve the sugar coating on contact. It’s like trying to put powdered sugar on a freshly glazed donut — chemistry doesn’t allow it.
The Fix:
Dry them longer than you think you need to — this is the step where patience = success
They should feel slightly tacky but not WET before coating
If you live in a humid climate, use the oven or dehydrator method instead of air-drying
The Humidity Hack: If it’s super humid (looking at you, Florida), add a silica gel packet to your storage container. Not touching the candy — just thrown in the bottom. It’ll absorb ambient moisture.
🎁 BONUS: Gift Packaging Ideas
Since you asked for the “Holiday/Gift Angle,” here’s how to make these look like $20 boutique treats:
Mini Mason Jars (4 oz size) tied with twine and a kraft paper label
Cellophane Bags tied with ribbon, with a “Made by [Your Name]” sticker
Vintage Tins from thrift stores (wash them first, obviously)
Stacked in a Small Box lined with tissue paper, topped with a recipe card
The Label Copy That Sells It:
“Artisan Candied Orange Peels
Zero-Waste | Small-Batch | Made With Love
(And Way Better Than Store-Bought)”
📌 Final Thoughts (The Blogger Sign-Off)
Here’s the thing about candied orange peels: they sound fancy, but they’re basically controlled trash alchemy. You’re taking something that 99% of people throw in the garbage and turning it into a treat that costs $18/lb at Williams Sonoma.
The triple-blanch is your insurance policy against bitterness. The long drying time is your insurance policy against a sticky mess. And the superfine sugar? That’s your insurance policy against looking like an amateur.
Make a batch this weekend. Eat half while binge-watching Netflix. Gift the other half and watch people’s faces when you tell them it’s made from orange peels.
You just became the person who “makes their own fancy candy.” Wear that crown.
Now go forth and rescue some citrus peels from the trash. Your taste buds (and your wallet) will thank you. 🍊✨
Subscribe to our newsletter
Cook it before it’s trending