3-Ingredient Strawberry Cheesecake Dump Cake — The Easiest Dessert You'll Ever Make!
COOKBOOK
3-Ingredient Strawberry Cheesecake Dump Cake — The Easiest Dessert You’ll Ever Make!
By The Kitchenette Bite | Easy Dessert Recipes | Dump Cake Recipes
If you’ve never made a dump cake before, your life is about to change completely. And if you HAVE made a dump cake before — this Strawberry Cheesecake version is about to become your absolute favorite one yet. We’re talking a gorgeous golden buttery crust on top, a thick creamy cheesecake layer in the middle, and a deep jewel-red strawberry filling bubbling up from the bottom. Three layers of pure heaven — from just 3 main ingredients and 5 minutes of prep.
This recipe is perfect for Valentine’s Day, Galentine’s Day, a last-minute dinner party dessert, or honestly just a random Tuesday when you want something incredible without any effort. The oven does literally all the work. No mixing bowls, no electric mixer, no complicated steps — just dump, layer, bake, and prepare to be completely obsessed.
📌 This post also answers the TOP questions real people are asking on Reddit about dump cakes — so you’ll have zero confusion going into baking day! And click the Visit Site button to get the full printable recipe card with step-by-step photos!
🛒 Ingredients List
The 3 Hero Ingredients:
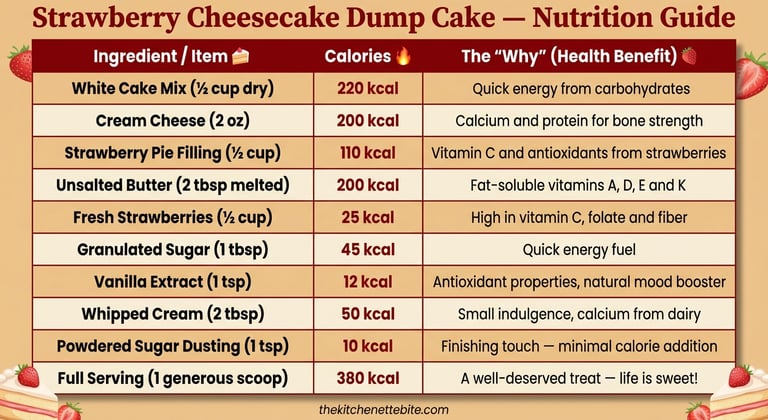
1 box white cake mix (15.25 oz)
1 can (21 oz) strawberry pie filling
8 oz cream cheese, softened and cubed
Additional Ingredients:
½ cup (1 stick) unsalted butter, thinly sliced
1 tsp vanilla extract
2 tbsp granulated sugar
½ cup fresh strawberries, hulled and sliced (optional but highly recommended for extra freshness)
Pinch of salt
For Serving:
Freshly whipped cream or vanilla ice cream
Powdered sugar for dusting
Extra fresh strawberries for garnish
👩🍳 Step-By-Step Instructions
Step 1: Preheat and Prep Your Dish
Preheat your oven to 350°F. Lightly grease a 9x13 inch baking dish with butter or non-stick cooking spray. This step is easy to skip but don’t — it makes serving and cleanup so much easier. Set the dish aside while you prepare the layers.
Step 2: Layer the Strawberry Filling
Pour the entire can of strawberry pie filling into the bottom of your prepared baking dish. Spread it out evenly with a spatula all the way to the edges — this is your base layer and it needs to be even so every scoop gets that gorgeous red filling. If you’re using fresh strawberries, scatter the sliced fresh strawberries over the pie filling now and press them down gently. Sprinkle the granulated sugar and vanilla extract over the strawberry layer. The sugar helps the filling caramelize slightly on the edges — absolute magic.
Step 3: Add the Cream Cheese Layer
Take your softened cream cheese and drop it in small spoonfuls evenly across the entire strawberry layer. Don’t worry about making it perfect — it will melt and spread as it bakes, creating that irresistible creamy cheesecake layer. The key here is that the cream cheese must be properly softened at room temperature, not cold from the fridge. Cold cream cheese won’t melt properly and you’ll end up with hard lumps instead of a creamy layer. Leave the cream cheese out for at least 1 hour before baking.
Step 4: Dump the Cake Mix
Now for the most satisfying step — open your box of white cake mix and pour it dry and straight from the box directly over the cream cheese layer. Yes, dry. Do NOT mix it with anything. Spread it evenly with a spatula or your hands until it covers the entire surface of the dish in an even layer from edge to edge. This dry cake mix layer is what creates that incredible golden buttery crust on top.
Step 5: Add the Butter
Take your cold butter and slice it into thin pats — aim for about 20–24 thin slices. Lay the butter slices in a single layer across the top of the dry cake mix, covering as much surface area as possible. The more evenly you cover the top with butter the more evenly golden and crispy your crust will be. Any spots you miss will look slightly powdery after baking — still delicious but not as pretty. Some people melt the butter and drizzle it over instead — both methods work, though sliced butter gives a slightly crispier top.
Step 6: Bake to Golden Perfection
Place the baking dish in your preheated 350°F oven and bake for 45–55 minutes. You’ll know it’s done when the top is deep golden brown and crispy all over, and the strawberry filling is visibly bubbling up around the edges. The whole kitchen will smell absolutely incredible — warm strawberries, butter, and vanilla. Let it rest for at least 15 minutes before scooping — this allows the layers to set slightly so you get those beautiful distinct layers in every serving.
Step 7: Serve and Enjoy
Scoop generous portions into bowls and top with a big dollop of freshly whipped cream or a scoop of vanilla ice cream. Dust with powdered sugar and add a few fresh strawberry slices on top. Serve warm for the most indulgent experience — the cream cheese layer is extra gooey and the strawberry filling is still bubbling slightly. Pure dessert heaven.
🙋 Top Dump Cake Questions from Reddit — Answered!
❓ Reddit Q1: “My dump cake top came out powdery and dry in spots — what went wrong?”
This is by far the most common dump cake complaint on Reddit and it always comes down to butter coverage! The dry cake mix needs fat — specifically butter — to bake into that golden crust. If you have dry powdery patches it means those spots didn’t get enough butter. The fix is simple: use more butter than you think you need and make sure your slices are thin and cover the entire surface with no gaps. Some bakers add an extra 2 tbsp of melted butter drizzled over the top after laying the slices just to fill any gaps. You can also fix it MID-BAKE — if you notice dry spots at the 25-minute mark, quickly dot a few extra thin butter slices on the dry areas and continue baking.
❓ Reddit Q2: “Can I use fresh strawberries instead of canned pie filling in a dump cake?”
You can, but you need to make a few adjustments or the result will be too watery and the cake won’t set properly. Fresh strawberries release a lot of liquid as they bake which is great for flavor but can make the bottom layer soupy. The best approach is to toss your fresh strawberries with ¼ cup sugar and 2 tbsp cornstarch before adding them to the dish — the cornstarch thickens the juices as they bake, giving you that glossy jammy texture similar to pie filling. You can also do a mix of both: one can of strawberry pie filling plus 1 cup of fresh sliced strawberries on top of it. This gives you the best of both worlds — the thickness and sweetness of the filling plus the bright fresh flavor of real strawberries.
❓ Reddit Q3: “How do I store leftover dump cake and how long does it last?”
Dump cake stores really well which makes it great for making ahead! Once completely cooled, cover the baking dish tightly with plastic wrap or aluminum foil and refrigerate for up to 4 days. The flavors actually deepen overnight and many people (including us!) think it tastes even better on day two when the layers have had time to meld together. To reheat, scoop individual portions into a microwave-safe bowl and microwave for 45–60 seconds until warmed through. You can also reheat the entire dish covered in foil at 325°F for 15–20 minutes. Dump cake can also be frozen — portion it into freezer-safe containers and freeze for up to 2 months. Thaw overnight in the fridge and reheat as above.
💡 Pro Tips for the Perfect Dump Cake Every Time
Always use room temperature cream cheese — this is non-negotiable for a smooth creamy cheesecake layer. Set it out at least an hour before you plan to bake.
Don’t stir anything! The whole magic of a dump cake is the distinct layers — the moment you start mixing you lose those beautiful separate layers.
Cover the entire top with butter — no gaps, no dry spots. More butter coverage equals a more beautiful golden crust.
Let it rest before scooping — at least 15 minutes out of the oven. It sets the layers and makes every scoop picture-perfect.
For extra flavor add ½ tsp almond extract to the strawberry layer — it enhances the strawberry flavor in the most incredible way.
Try it with different cake mix flavors — yellow cake mix gives a richer buttery flavor, strawberry cake mix doubles down on the berry flavor, and vanilla cake mix keeps it light and delicate.
🍓 Variations to Try
Strawberry Lemon Dump Cake: Add 1 tbsp lemon zest and 1 tbsp lemon juice to the strawberry filling layer. The citrus brightness cuts through the richness beautifully.
Strawberry Chocolate Dump Cake: Swap white cake mix for chocolate cake mix and add a handful of dark chocolate chips over the cream cheese layer. Rich, decadent, and absolutely incredible.
Mixed Berry Cheesecake Dump Cake: Replace strawberry pie filling with a mix of strawberry and blueberry pie filling. Gorgeous color and even more complex flavor.
Strawberry Cheesecake Dump Cake Bars: Press the finished cake firmly into the dish while still warm, let it cool completely in the fridge for 2 hours, then slice into bars. Perfect for parties and potlucks — no spoon required!
🎉 The Easiest Most Impressive Dessert of Your Life Awaits!
There you have it — the dump cake recipe that is going to become your most-requested dessert from this day forward. It’s shockingly easy, impossibly delicious, and absolutely stunning when you scoop into those three gorgeous layers. Whether you’re making it for Valentine’s Day, Galentine’s Day, a dinner party, or just because you deserve something amazing tonight — this Strawberry Cheesecake Dump Cake delivers every single time.
Save this to your Pinterest board so you always have it when you need a last-minute showstopper dessert — and click the Visit Site button for the full printable recipe card at thekitchenettebite.com! 🍓
Subscribe to our newsletter
Cook it before it’s trending